Table Contents
- Introduction
- Package Configuration
- Simple Method
- Customize the Printer
- Custom Log Printer

Introduction
Logger Package is a package that is small easy to use and an extensible logger which prints beautiful and colorful logs in our console.
Get Started
First, you need to create a project using the terminal ‘create flutter project_name’
After successfully created. You need to open the project using this command line ‘code .’ in the terminal and you can see your project files. And then we can add the LOGGER PACKAGE in pub.yaml like this.
logger: ^1.4.0
Flutter Logger Package Configuration
Next, we create a simple homepage.dart file and we add 3 elevated buttons to navigate the loggerpage1, loggerpage2, and loggerpage3 then screen respectively.
import 'package:flutter/material.dart';

class Homepage extends StatelessWidget {
  const Homepage({super.key});

  @override
  Widget build(BuildContext context) {
    return Scaffold(
      appBar: AppBar(
        title: const Text('Logger'),
        centerTitle: true,
      ),
      body: Center(
        child: Column(
          crossAxisAlignment: CrossAxisAlignment.center,
          mainAxisAlignment: MainAxisAlignment.center,
          children: [
            ElevatedButton(
                onPressed: () {}, child: const Text('Logger Page 1')),
            ElevatedButton(
                onPressed: () {}, child: const Text('Logger Page 2')),
            ElevatedButton(onPressed: () {}, child: const Text('Logger Page 3'))
          ],
        ),
      ),
    );
  }
}
Simple Method of Logger Package
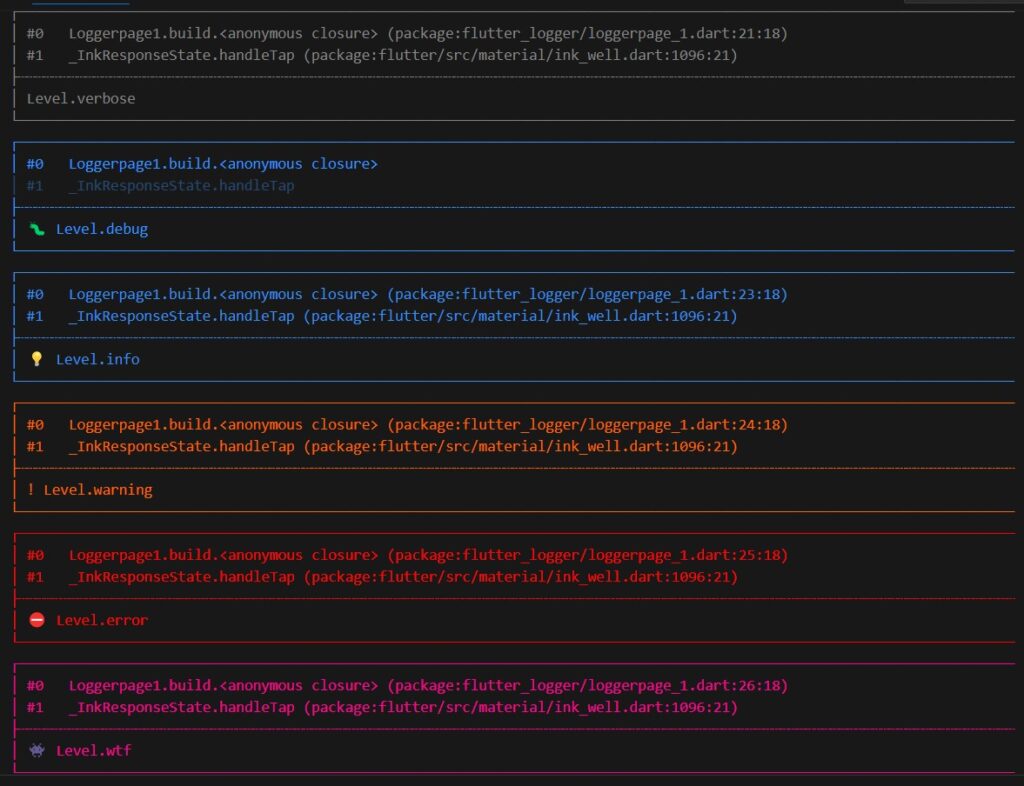
In our loggerpage1.dart, we create a text widget wrapped by a center widget and a floating action button to print the logs with different types of logger package.
The Logger Package has 6 types of logs:
- Verbos
- Debug
- Info
- Warning
- Error
- What a terrible failure
import 'package:flutter/material.dart';
import 'package:logger/logger.dart';

class Loggerpage1 extends StatelessWidget {
  final logger = Logger();

  Loggerpage1({super.key});

  @override
  Widget build(BuildContext context) {
    return Scaffold(
      appBar: AppBar(
        title: const Text('Looger Page 1'),
        centerTitle: true,
      ),
      body: const Center(
        child: Text('Click on + button'),
      ),
      floatingActionButton: FloatingActionButton(
        onPressed: () {
          logger.v('Level.verbose');
          logger.d('Level.debug');
          logger.i('Level.info');
          logger.w('Level.warning');
          logger.e('Level.error');
          logger.wtf('Level.wtf');
        },
        child: const Icon(Icons.add),
      ),
    );
  }
}
and click the floating action button it prints the log on the console

Customize the Printer in Logger Package
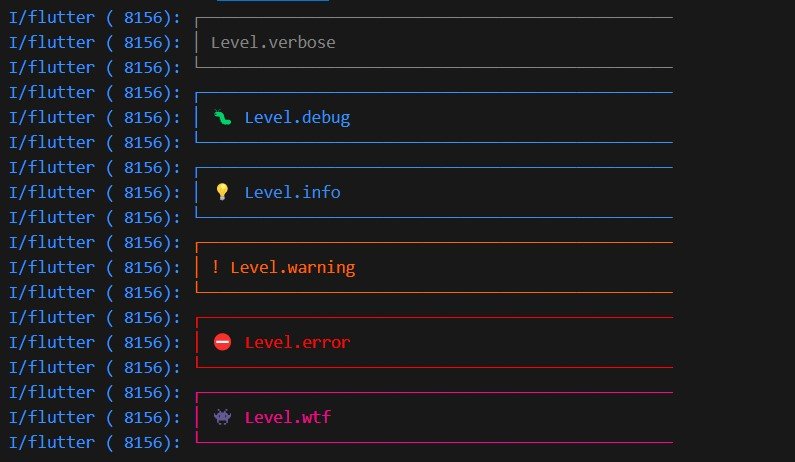
Next, In our loggerpage2.dart assigns the logger object to our logger variable with the property printer set to PrettyPrinter having properties.
- The one is Method count which is the number of methods called to be displayed.
- Another one is the Error method which is the number of methods calls if a stack trace is provided.
- Another one is Line Length which is the width of the output.
final logger = Logger(
   printer: PrettyPrinter(
     methodCount: 0,
     errorMethodCount: 3,
     lineLength: 50,
  ),
);
In our body, we created the text widget wrapped by the center widget and the floating action button same as before.
In the onPressed function of our button, we printed multiple logs with properties messages and errors. Now you can see if I press the floating action button our logs has been displayed in our customize method.

Here is the loggerpage2.dart full code
import 'package:flutter/material.dart';
import 'package:logger/logger.dart';

class Loggerpage2 extends StatelessWidget {
  final logger = Logger(
      printer: PrettyPrinter(
    methodCount: 0,
    errorMethodCount: 3,
    lineLength: 50,
  ));

  @override
  Widget build(BuildContext context) {
    return Scaffold(
      appBar: AppBar(
        title: const Text('Looger Page 2'),
        centerTitle: true,
      ),
      body: const Center(
        child: Text('Click on + button'),
      ),
      floatingActionButton: FloatingActionButton(
        onPressed: () {
          logger.v('Level.verbose');
          logger.d('Level.debug');
          logger.i('Level.info');
          logger.w('Level.warning');
          logger.e('Level.error');
          logger.wtf('Level.wtf');
        },
        child: const Icon(Icons.add),
      ),
    );
  }
}
Custom Log Printer
Next, In our loggerpage3.dart we have called our logger function with the property loggerpage3 which is basically our stateful class and assign its result to the variable named log.
final log = logger(Loggerpage3);
This is our logger function which takes a type as its parameter and returns a Logger object with the printer property set to the custom lock printer that we have created the custom lock printer is initialized with the string representation of the type object passed as an argument to the logger function.
final logger = (Type type) => Logger(printer: CustomLogPrinter(type.toString()));
This is our custom lock printer class that extends the log printer and takes the class name as an argument to show from which class is the logger showing in the console.
class CustomLogPrinter extends LogPrinter {
  final String className;
  CustomLogPrinter(this.className);
}
Next, we override the log method of the log printer class and define a variable color which is assigned the value of color associated with the log level of a log event.
Next, we define the variable emoji which is assigned the value of emoji associated with the log level of the log event.
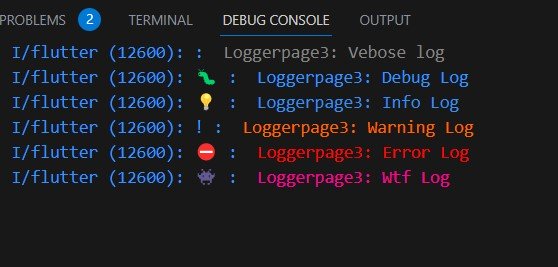
Next, we define the variable message which is assigned the value of the message associated with the log level of the log event. After that, we return a list of strings having the color emoji class name and message.
  @override
  List<String> log(LogEvent event) {
    final color = PrettyPrinter.levelColors[event.level];
    final emoji = PrettyPrinter.levelEmojis[event.level];
    final message = event.message;

    return [color.toString(), ('$emoji: $className: $message')];
}
Here is the custom_logger.dart full code
import 'package:logger/logger.dart';

final logger = (Type type) => Logger(printer: CustomLogPrinter(type.toString()));

class CustomLogPrinter extends LogPrinter {
  final String className;
  CustomLogPrinter(this.className);

  @override
  List<String> log(LogEvent event) {
    final color = PrettyPrinter.levelColors[event.level];
    final emoji = PrettyPrinter.levelEmojis[event.level];
    final message = event.message;

    return [('$emoji: $color $className: $message')];
  }
}
Now coming back to our loggerpage3.dart, we have created multiple elevated buttons named verbose, debug, info, warning, and so on to display their respective logs.
import 'package:flutter/material.dart';

import 'custom_logger.dart';

class Loggerpage3 extends StatelessWidget {
  final log = logger(Loggerpage3);

  Loggerpage3({super.key});

  @override
  Widget build(BuildContext context) {
    return Scaffold(
        appBar: AppBar(
          title: const Text('Looger Page 3'),
          centerTitle: true,
        ),
        body: Column(
          children: [
            ElevatedButton(
              onPressed: () {
                log.v('Vebose log');
              },
              child: const Text('Verbose'),
            ),
            ElevatedButton(
              onPressed: () {
                log.d('Debug Log');
              },
              child: const Text('Debug'),
            ),
            ElevatedButton(
              onPressed: () {
                log.i('Info Log');
              },
              child: const Text('Info'),
            ),
            ElevatedButton(
              onPressed: () {
                log.w('WarningLog');
              },
              child: const Text('Warning'),
            ),
            ElevatedButton(
              onPressed: () {
                log.e('Error Log');
              },
              child: const Text('Error'),
            ),
            ElevatedButton(
              onPressed: () {
                log.wtf('Wtf Log');
              },
              child: const Text('WTF'),
            ),
            ElevatedButton(
              onPressed: () {},
              child: const Text('Verbose'),
            ),
          ],
        ));
  }
}
If I press the verbose button you can see the verbose log and then if I press debug or info or warning or error or WTF button then the respective logs would be printed on the console.

That’s all guys, you can try this method and use this logger package in your project it can be more useful. If you need to build a Chome Extension yeah it’s available check it now.
The source code is available on GitHub and if you have any doubts just comment below.
Subscribe to our email newsletter to get the latest posts delivered right to your email.


Comments